Tag Archive | environment

What’s with all the Pioneer Woman stuff anyway?

Lately, I have been getting  a lot of questions about all the stuff I have been posting pictures of…soap and canned goods, etc.  The questions range from “are you becoming a hoarder?”  to “where are you going to put all that?” to “where does the motivation come from?”  So I decided to try to answer all the questions as best I can.  But it will be a bit of a journey.  For those who really want to know, read on.  To those of you who just want to taunt me with hoarder comments, stop reading because this post will surely ruin all your fun.  🙂

For the record, the philosophy that has spurned my recent activity is not new.  Up to this point, I haven’t been making things that were pretty (like soap and beautiful canned goods) so I didn’t take pictures that made people ask me questions.  I also don’t like to preach at people, so I haven’t necessarily talked about the changes I have made over time.  I The process has been gradual and recently, become a lifestyle choice as well as a hobby.

When my mom was diagnosed with breast cancer, I bought a book called, “Anticancer: A New Way of Life” by David Servan-Schreiber.  It was written by a doctor who was given a cancer diagnosis that by all rights should have claimed his life.  Through lots of research, he discovered some lifestyle things that he believed reduced the risk and spread of cancer by making the body less habitable to cancer cells.  He eventually died of his cancer in 2011, after nearly 20 years.  I like to think that his research and lifestyle changes gave him many of those 20 years. More about his life, theories and death can be found here and in other articles online.

During the same time period, my mom’s doctors (both her surgeon and oncologist) said that they only consume organic dairy because of all the added hormones in regular dairy.  Since my mom’s cancer was fed by estrogen, and our food products are from animals that have been fed an excess of estrogen to make them grow bigger, I took note.    That year, I gave myself a challenge of creating an organic Thanksgiving meal.  Every single ingredient I used (down to the pumpkin pie spice) was organic.  It was expensive, but a fun challenge (20 lb organic turkeys cost about  $100 in case you are interested). Since then, all our milk, eggs and butter are organic.  I buy organic cheese when I can but unfortunately, we eat a lot of cheese and organic cheese is very expensive and not that easy to come by.  We also buy organic grass fed beef (grass fed, rather than grain or corn fed beef has HUGE health benefits, as documented in the book and literature out there). We order from a farmer in Ohio who butchers and ships twice per year. Check out VanBuren’s Farm here  (you won’t be disappointed).

At around the same time, Mark’s daughter had some health issues that were amplified by chemicals or preservatives in food.  Before she had surgery to correct her issues, she had to go on an organic vegan diet.  This is probably what started my diligent label reading.  It made me very aware of how much of our food (especially the canned foods) has extra chemicals and preservatives in it.  I started to take the attitude that if I couldn’t pronounce it, I shouldn’t eat it.  Any prepared food with a long ingredient list is usually put back on the shelf.  This doesn’t mean that I have no processed food around, or that I don’t eat stuff at parties or restaurants.  I still love me some Cheetos and I’m pretty sure there is nothing in those that comes from nature.  But I am more diligent overall.

Fast forward…a little over a year ago, a friend of mine started posted things about diet changes she had made for her family.  We started communicating about it in private messages.  The changes she made were MAJOR and felt overwhelming to me, but she encouraged me to start small.  Rather than tomato products in cans, I should can my own (among other things).  Since I already mdke my own sauce, and I have canned in the past, I decided I could do that.  Since organic fresh produce is not widely available here, I contacted a local farmer about their spraying practices.  I liked what they said (only spot treatment, and only when necessary) so bought some tomatoes.  I spent a couple of weekends making and canning sauce made from their tomatoes and basil from the farmer’s market.   I loved doing it and loved that I had sauce for the year already made.

Last fall, I made another major change and gave up all soda.  For years, I drank Diet Coke every day and didn’t think I would ever give it up.  The more I saw about the evils of Diet Soda and artificial sweeteners, the more I became convinced that I needed to give it up.  We got a Sodastream Soda maker and I made the switch to carbonated water about a year ago.  I still like fizz and this has satisfied that craving.  Every once in a while, I think I want some Coke or something and will take a sip.  All that does is prove that I have lost the taste for it.  I can’t stand the sweetness and will hopefully never drink it again.

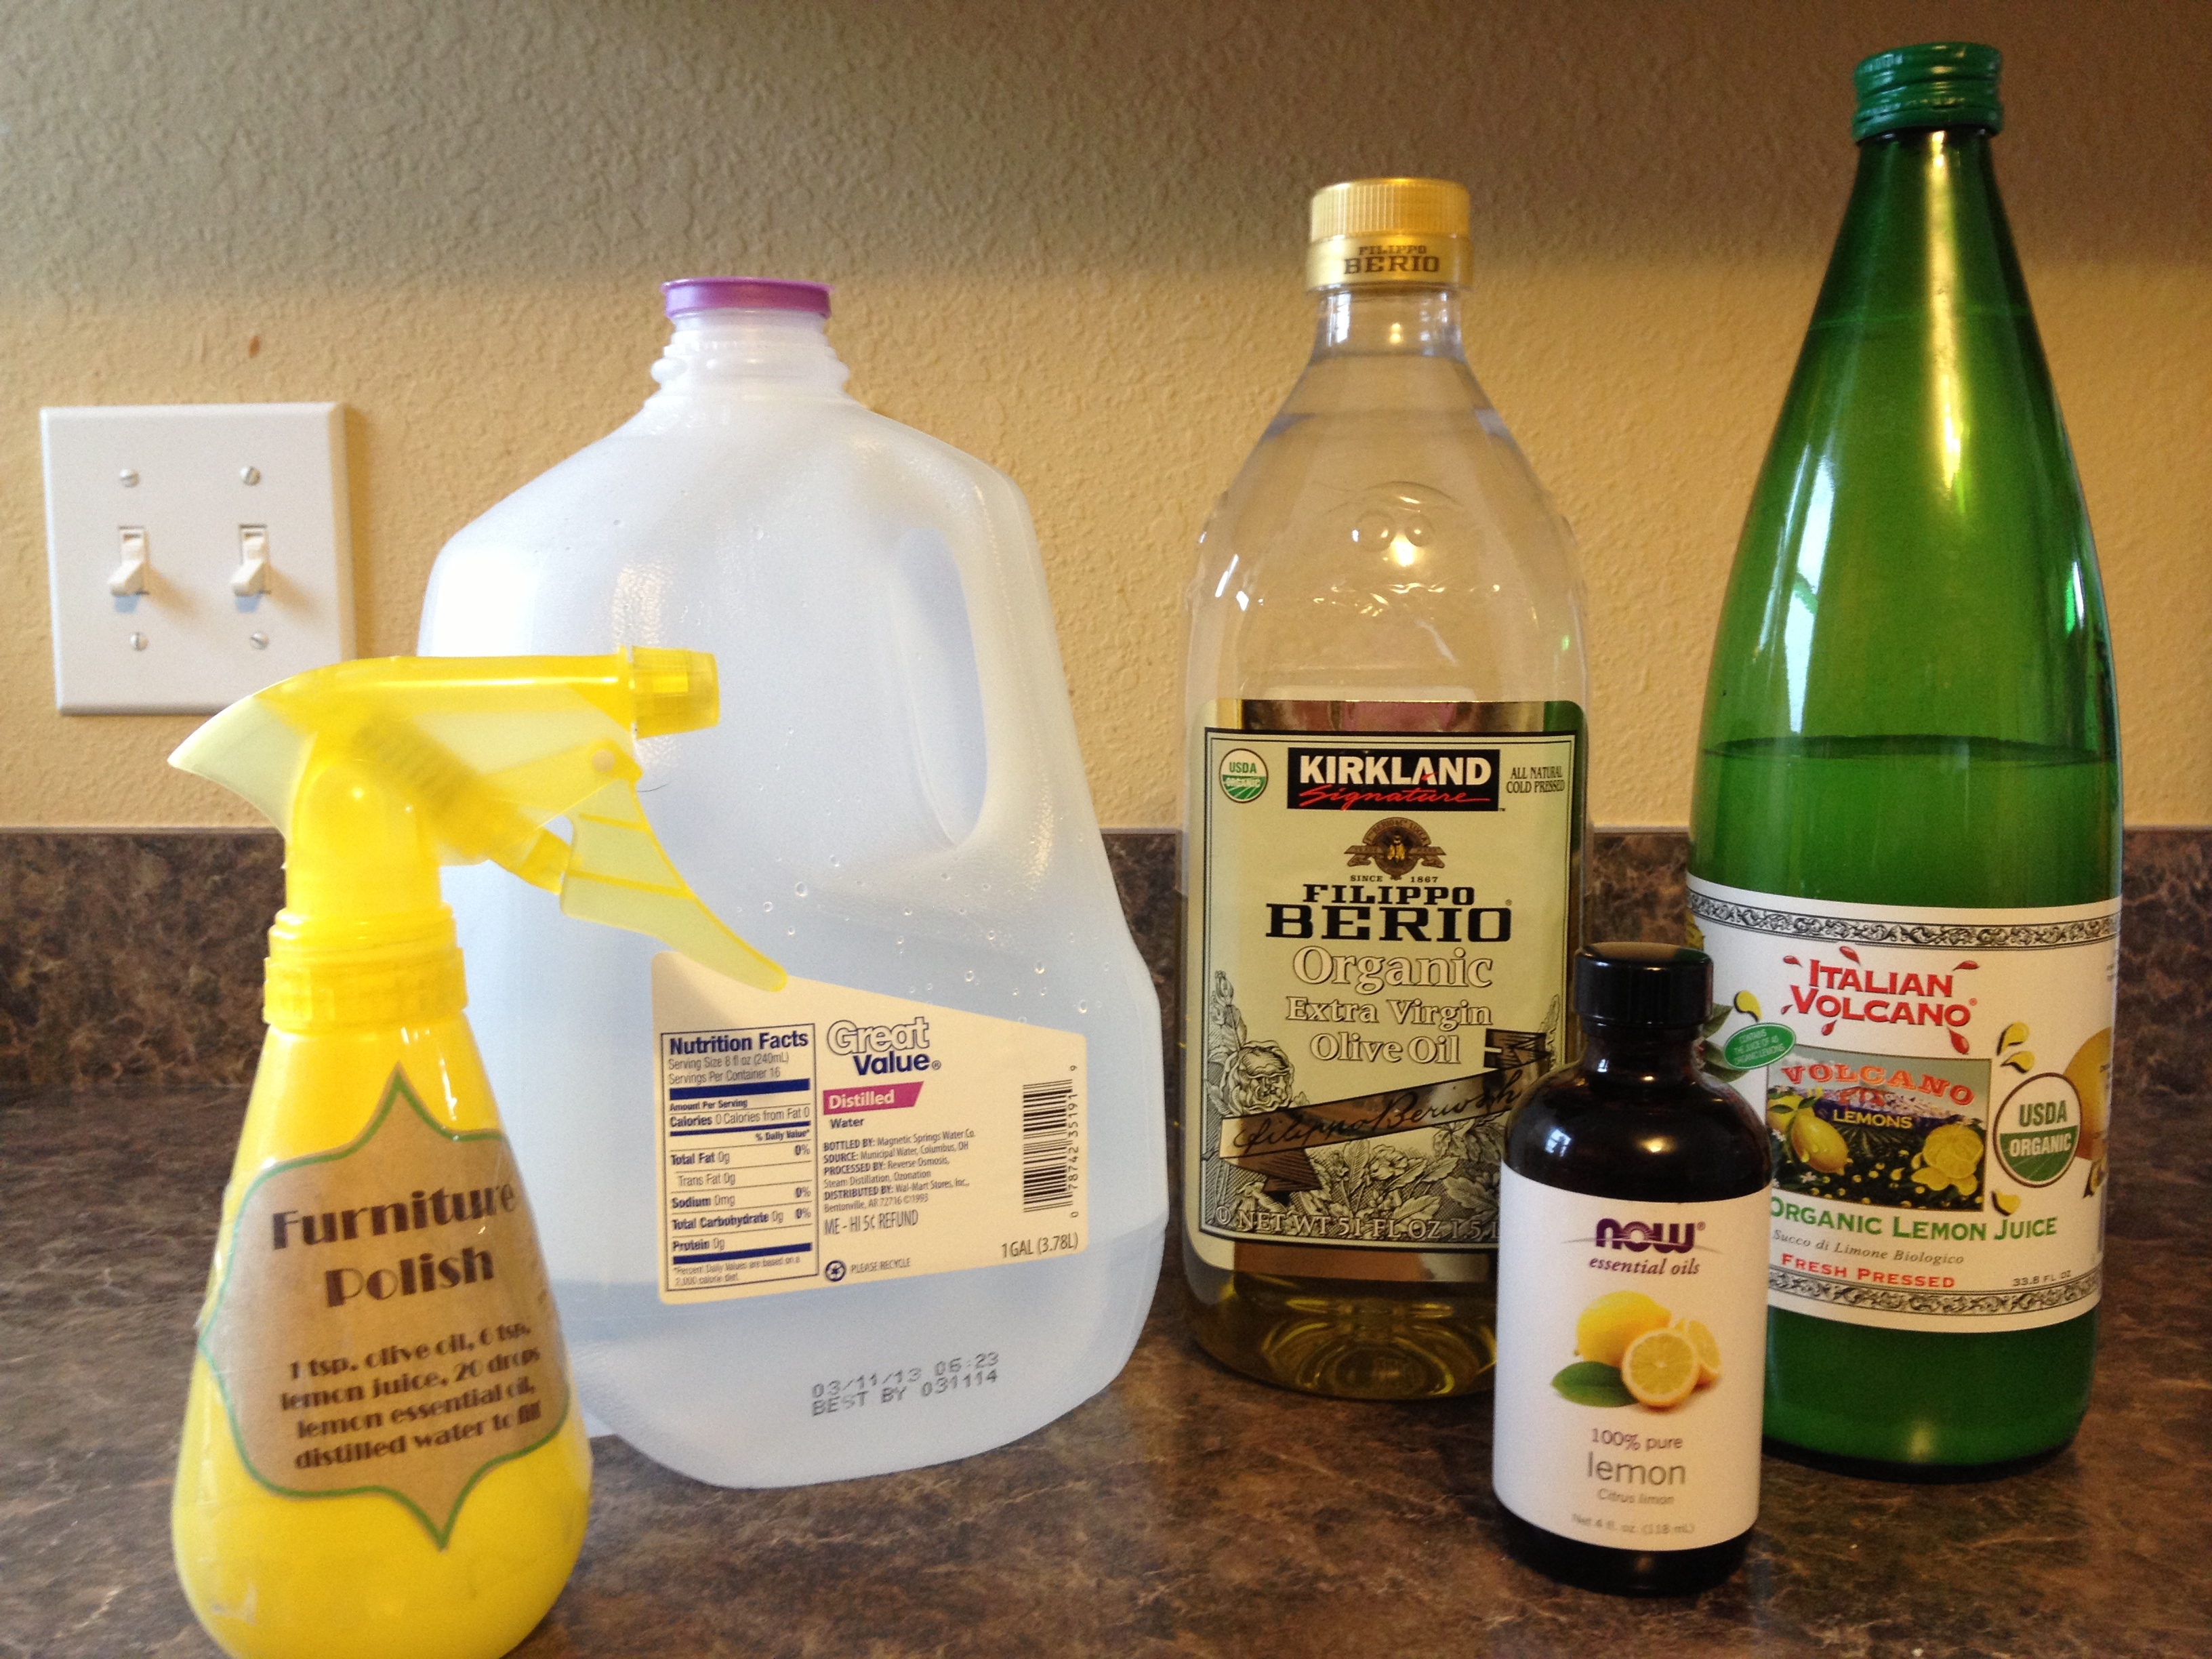
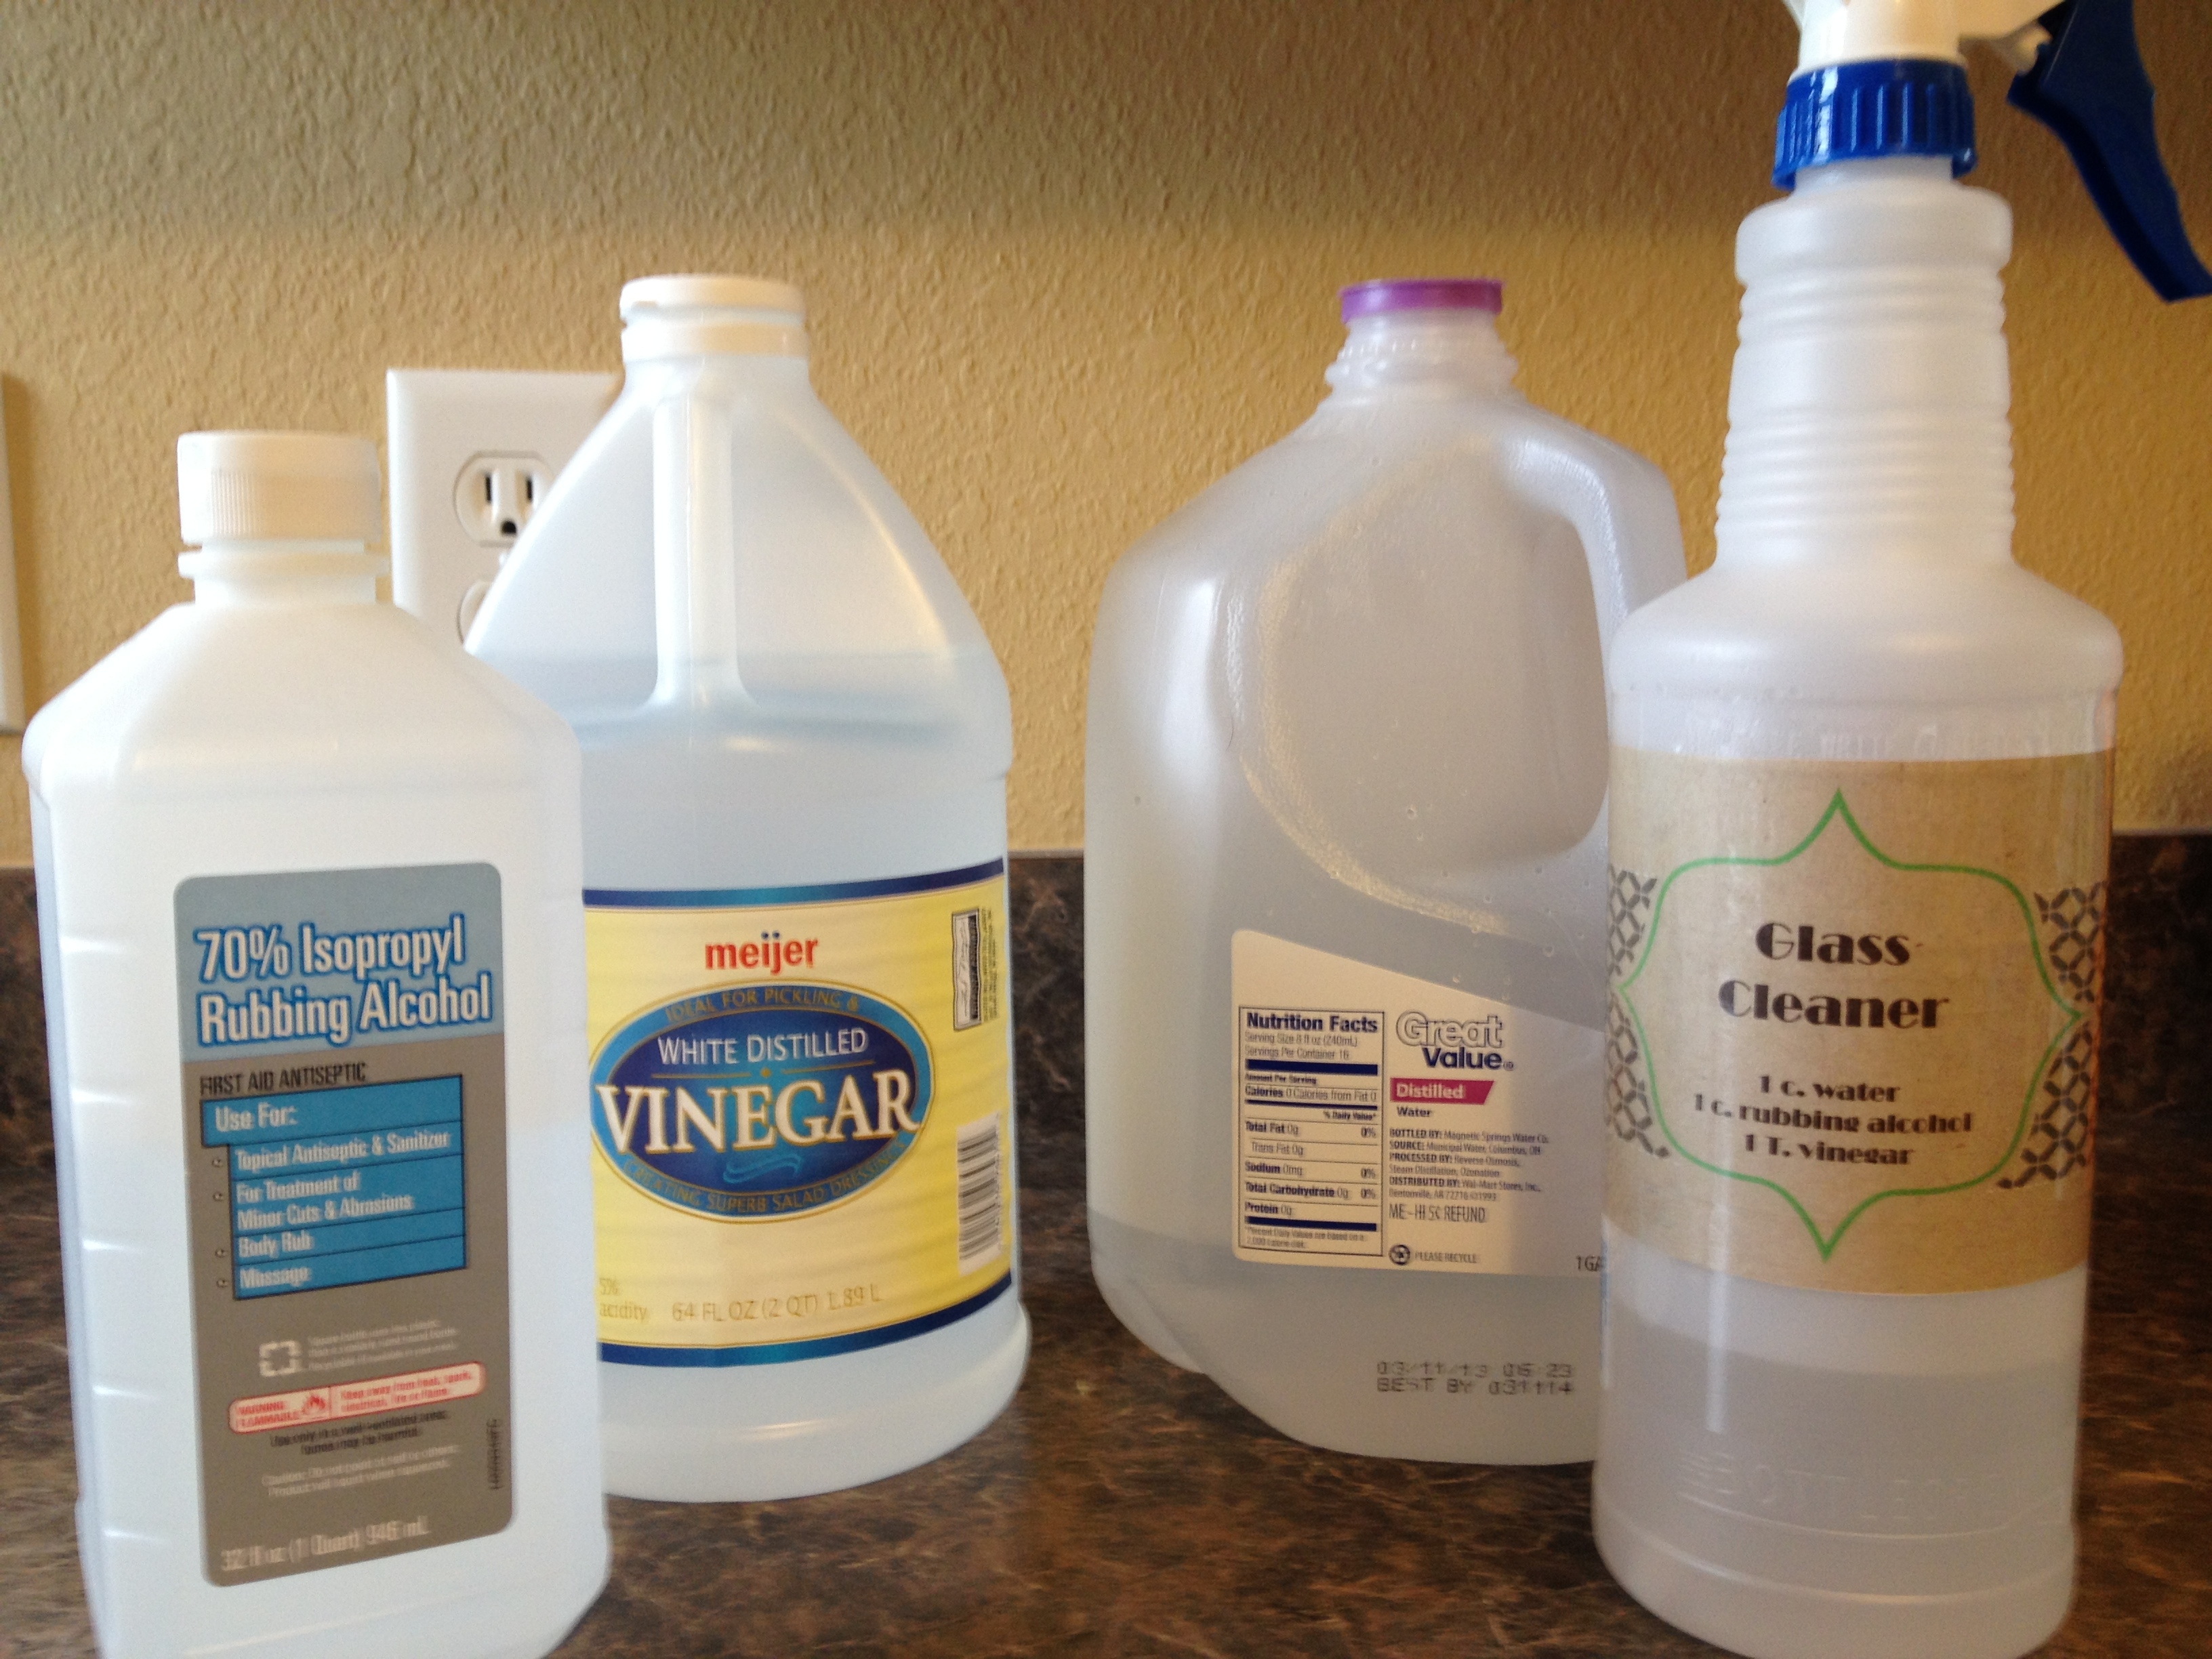
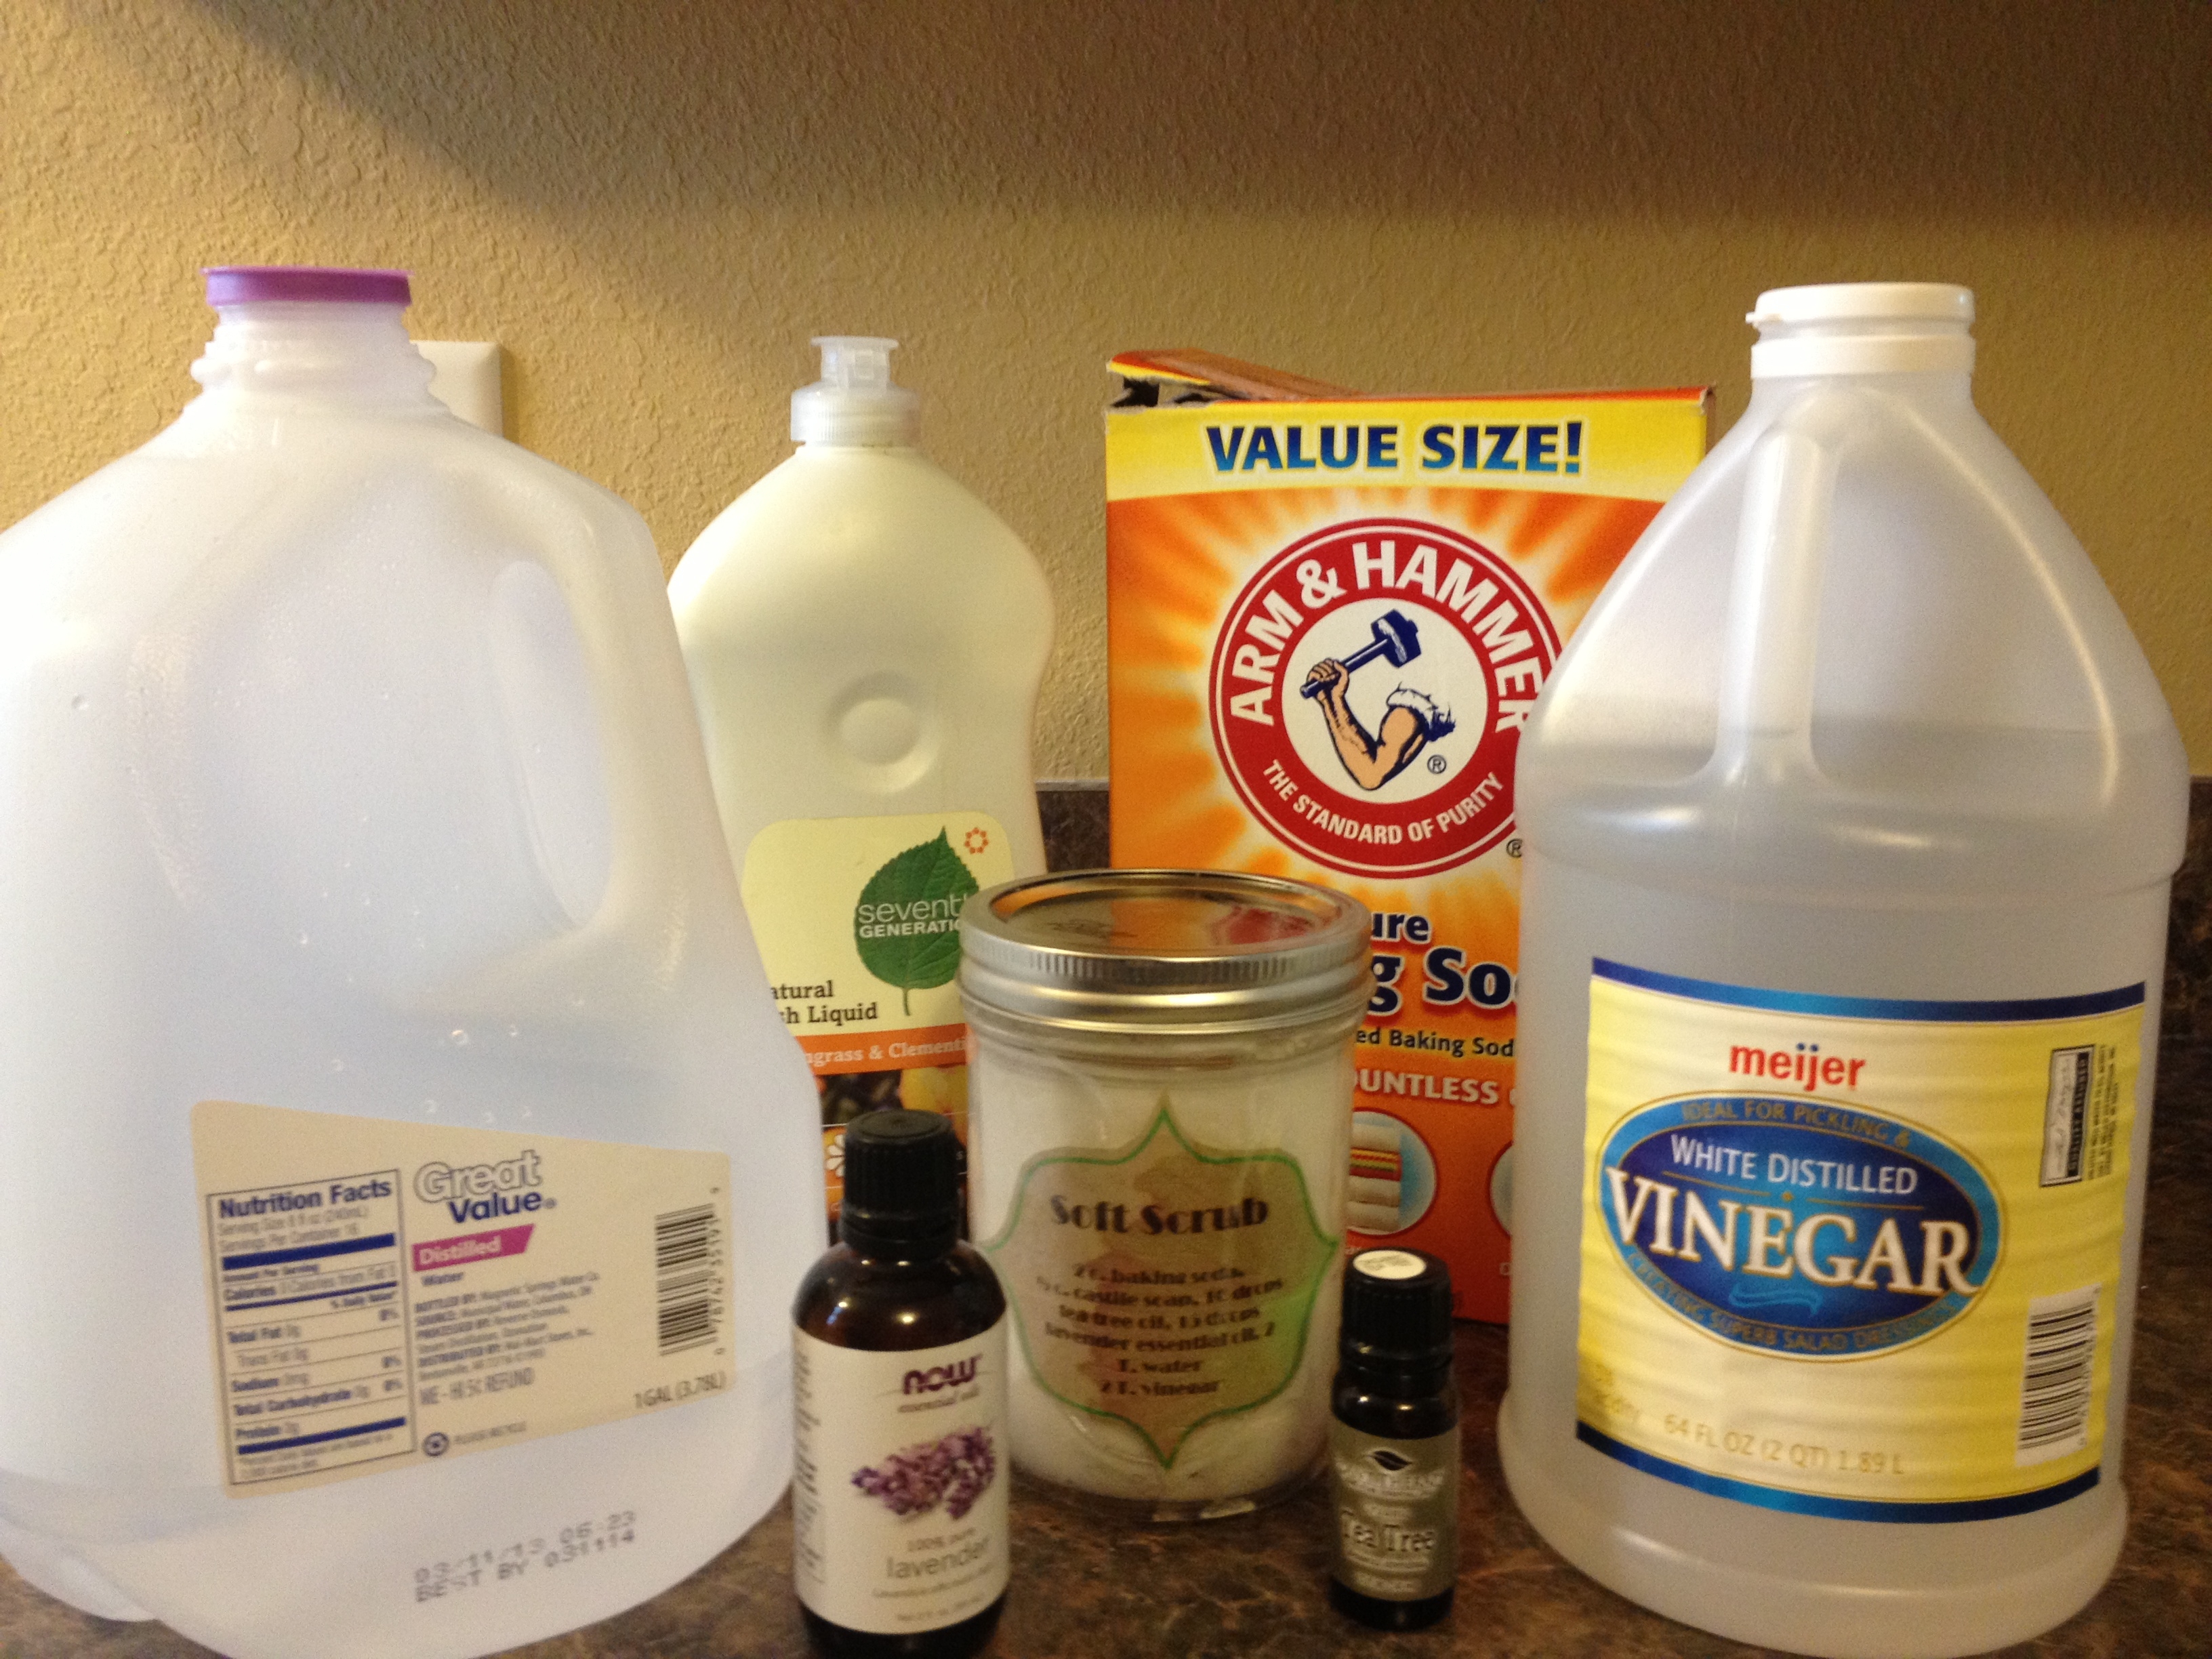
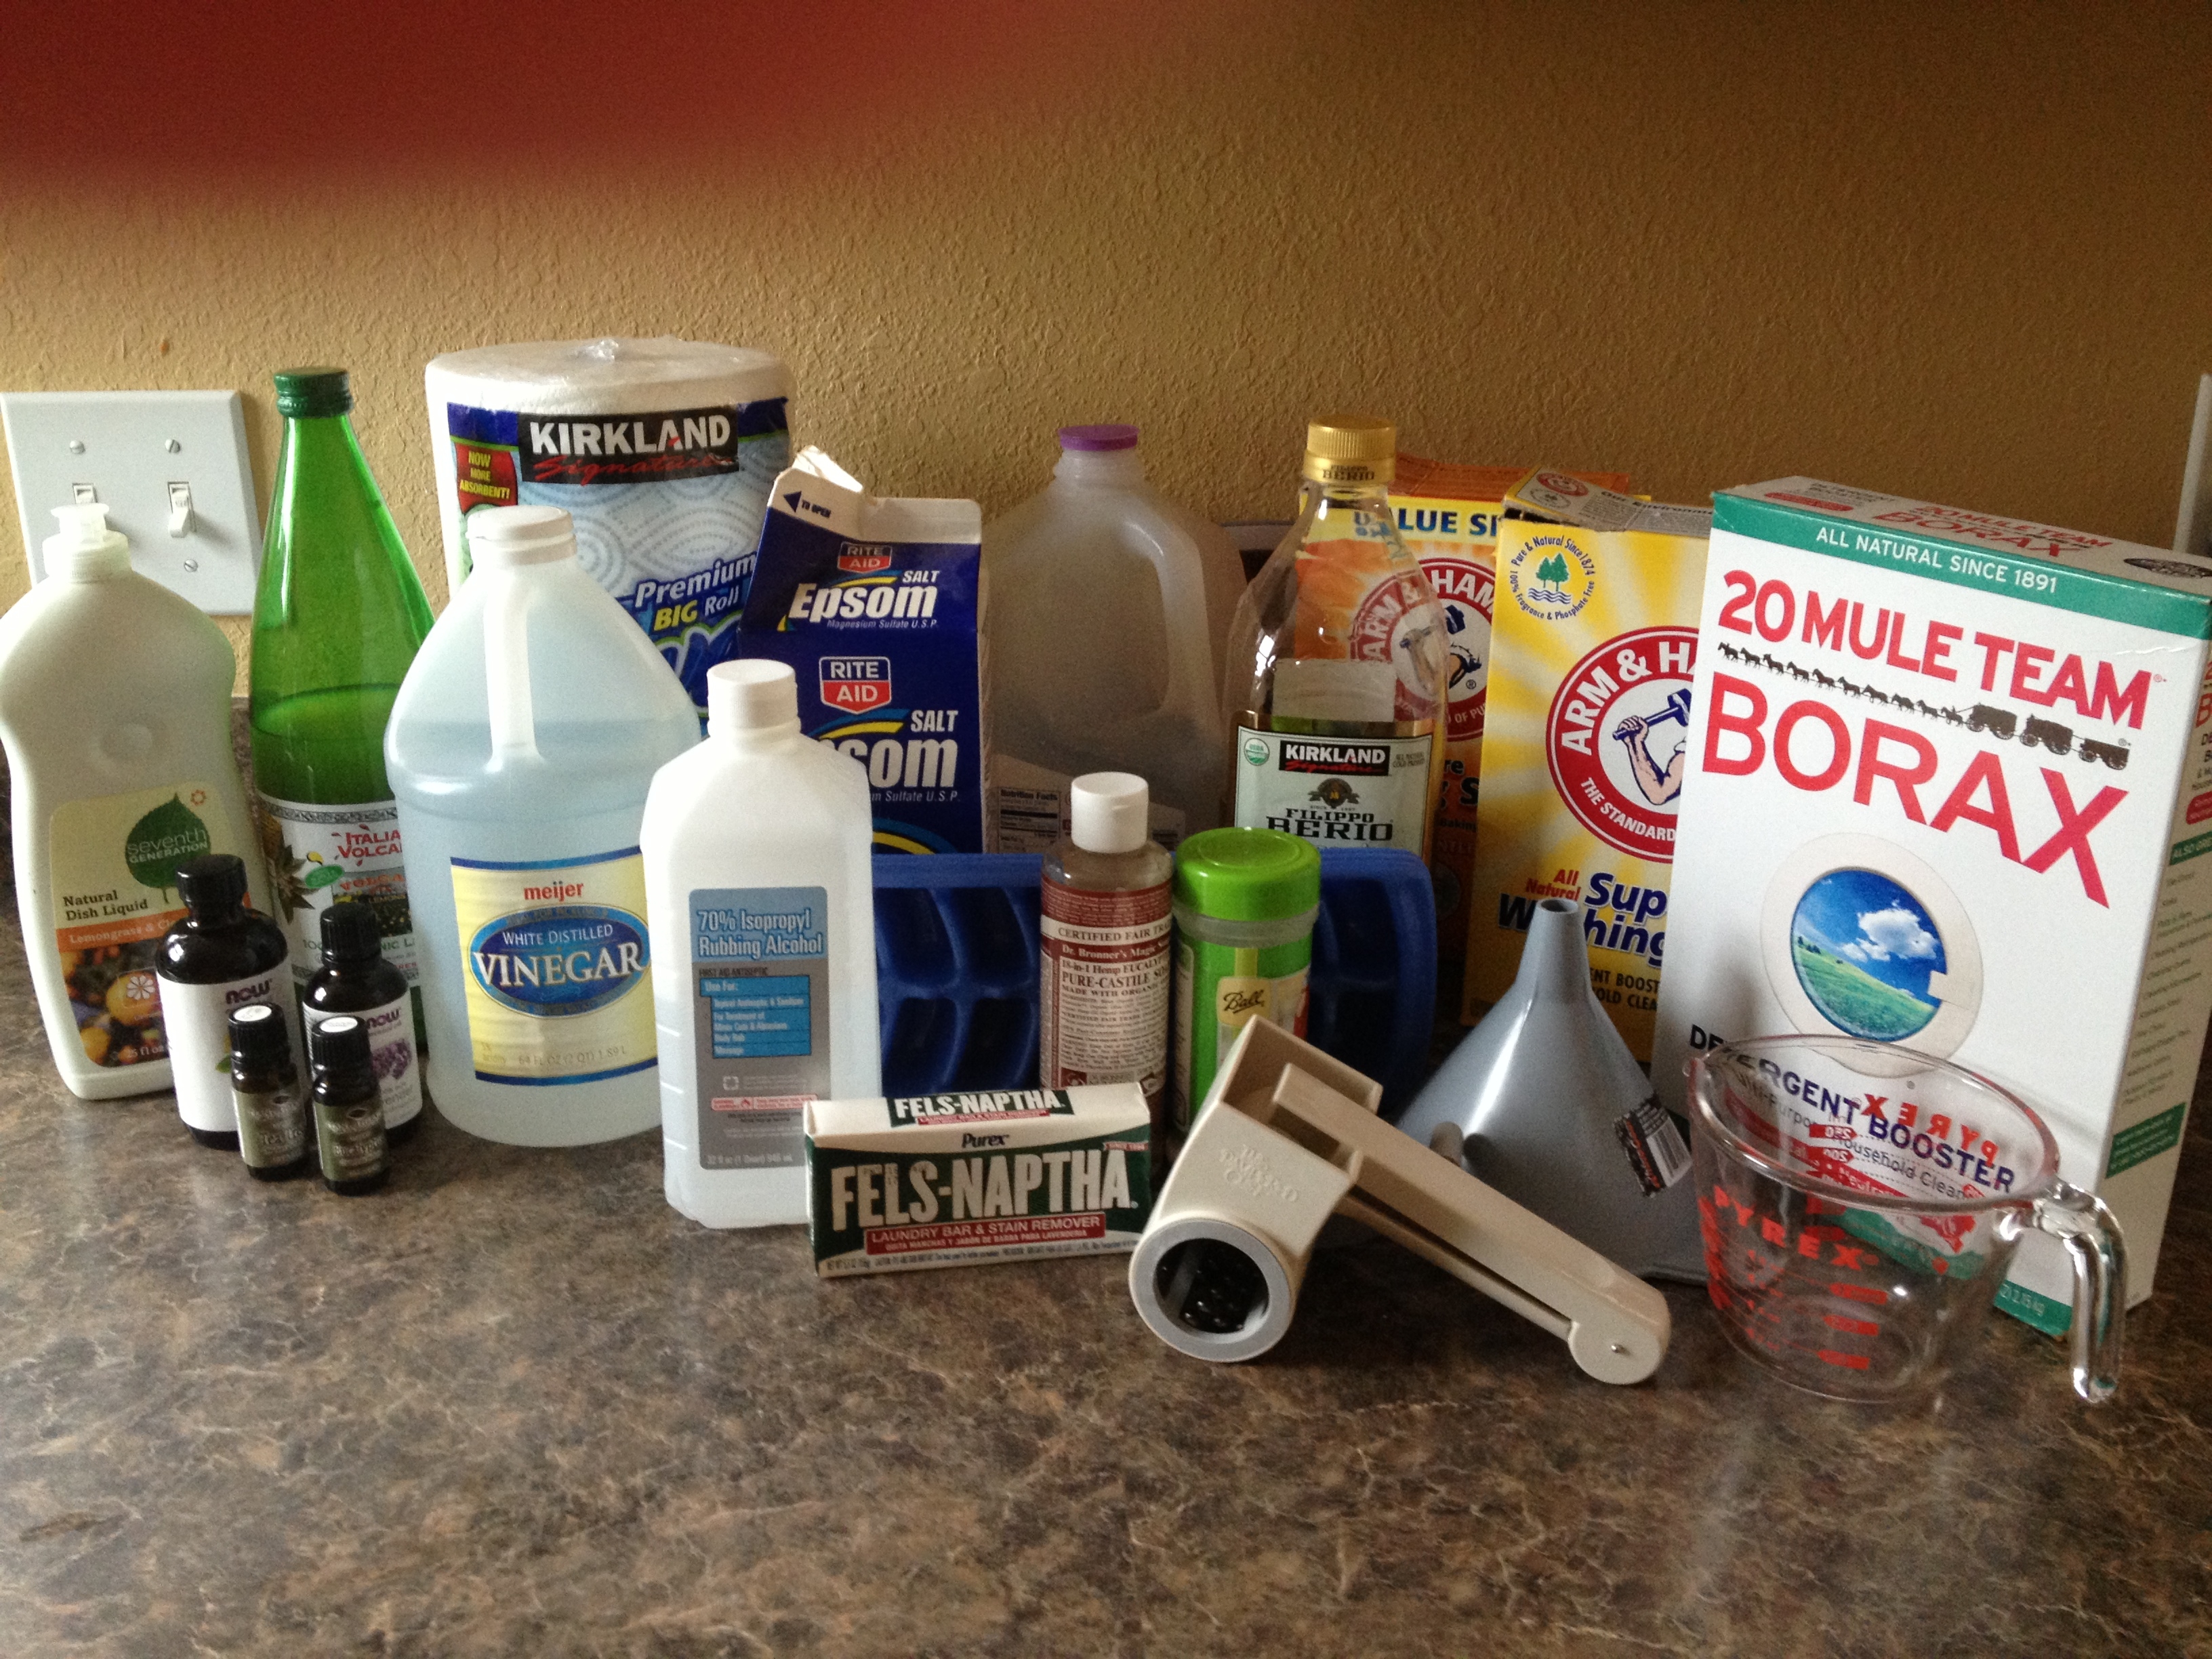
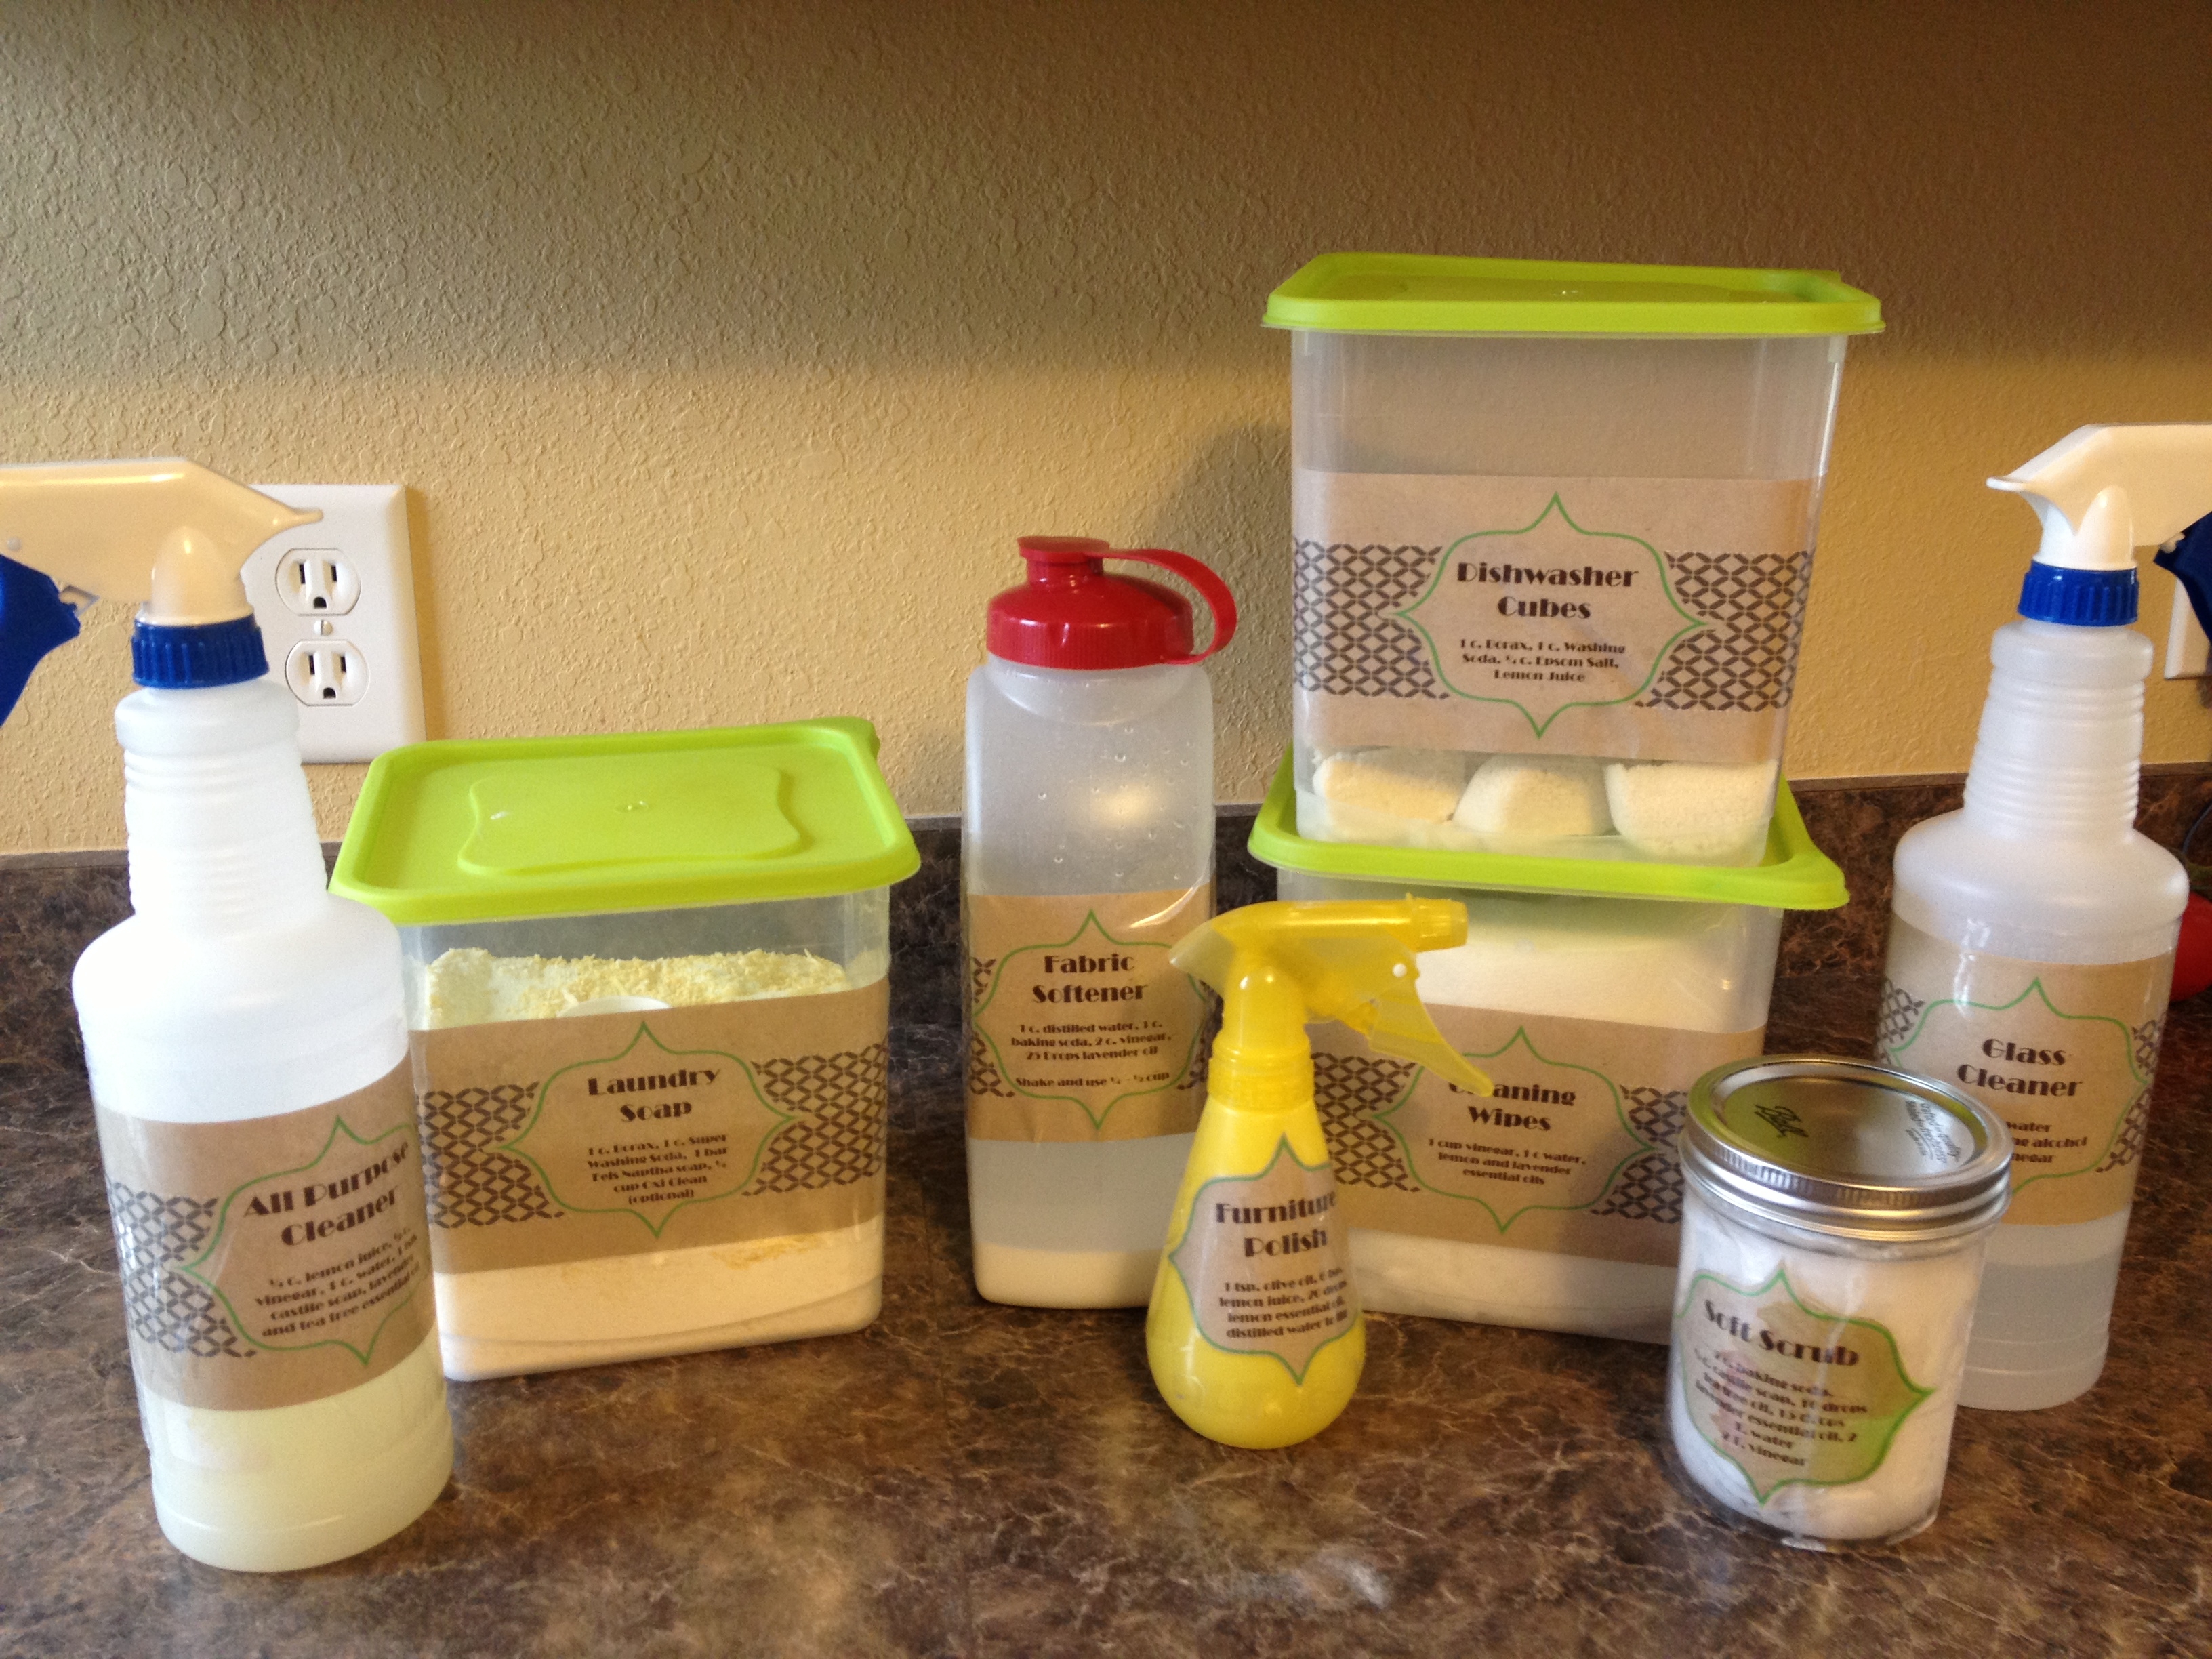
I really don’t know what got me so interested in making my own cleaning products.  Maybe it was Pinterest and all the things I was seeing about homemade laundry detergent and other cleaning products.  I know that I absolutely HATE the smell of bleach, do not like chemicals on the surfaces in my kitchen (if it isn’t safe to eat, why would I want it on my counter that will touch food)?  Truly “green” cleaning products are expensive so I decided to give it a whirl.  I did lots of research, bought some essential oils and the other ingredients that I didn’t already have (mostly lots of vinegar and a giant box of baking soda) and made a batch of cleaning products.  With the exception of the dishwasher soap (which I still can’t make work), I absolutely LOVED every product that I made, The smells were divine and they worked better than anything I have ever tried.  They are gentle on my hands and I don’t have to smell bleach.  I am hooked and will never go back.  Not only is this stuff super simple and fast to make, but it is  also incredibly inexpensive to make. I will save a ton of money over time.  It is also safe.  If it comes in contact with my food, I know that there would be no harm in consuming it.  After all, the primary ingredients come from my kitchen pantry. My favorite homemade products (and instructions) can be found here, here, here, here and here.  If you want to check out my “Going Natural” Pinterest board to see what other things I’d like to try, it can be found here.

Supplies

Products

Soap CollageAs I read more about cleaning products,  I saw many posts about hand made soap.  I researched this for a LONG time.  I read tons of stuff on the internet, bought books and finally got the courage to try it.  I ordered lye from a soapmaking supplier and made my first batch of hand made cold processed lye soap in May of this year.  The soap is amazing.  It is also a little like chemistry, which makes it really fascinating to me.  This is a hobby as much as anything because it is fun to research the properties of oils, how they change soap, different botanicals and their benefits, etc.  I never thought I would branch out on this little hobby, but I have started making lip balm, lotion and will be trying my hand at other beauty products this year.  My goal is to eliminate or replace as many of my commercial products as I can.  I no longer use commercially made shampoo or conditioner (instead use a handmade shampoo bar and apple cider vinegar rinse), facial cleanser (replaced with a facial bar with detoxifying clays), body wash (replaced with handmade body soaps), deodorant (this one surprised even me!!) and am in the process of replacing all my commercially made lotions.  By the end of this year, I hope to be using my own facial moisturizer, foundation, powder, blush, and sunscreen.  I also want to find replacements for other hair products (like hairspray) but haven’t even started that research yet.  The soap is not a money saver.  I have spent quite a bit of money on the oils and supplies that I use.  I use organic sustainable oils, which are not cheap. Each bar of soap costs nearly $2 to make.  However, many of the ingredients are also used in other products which ARE inexpensive to make.  (For example, the lip balm I make is very similar to Burt’s Bees, which cost $3.99 per tube.  Including the tubes, mine probably costs about $0.50 or less to make.  I haven’t figured the true costs yet …but it is cheap by comparison.)

canning collage
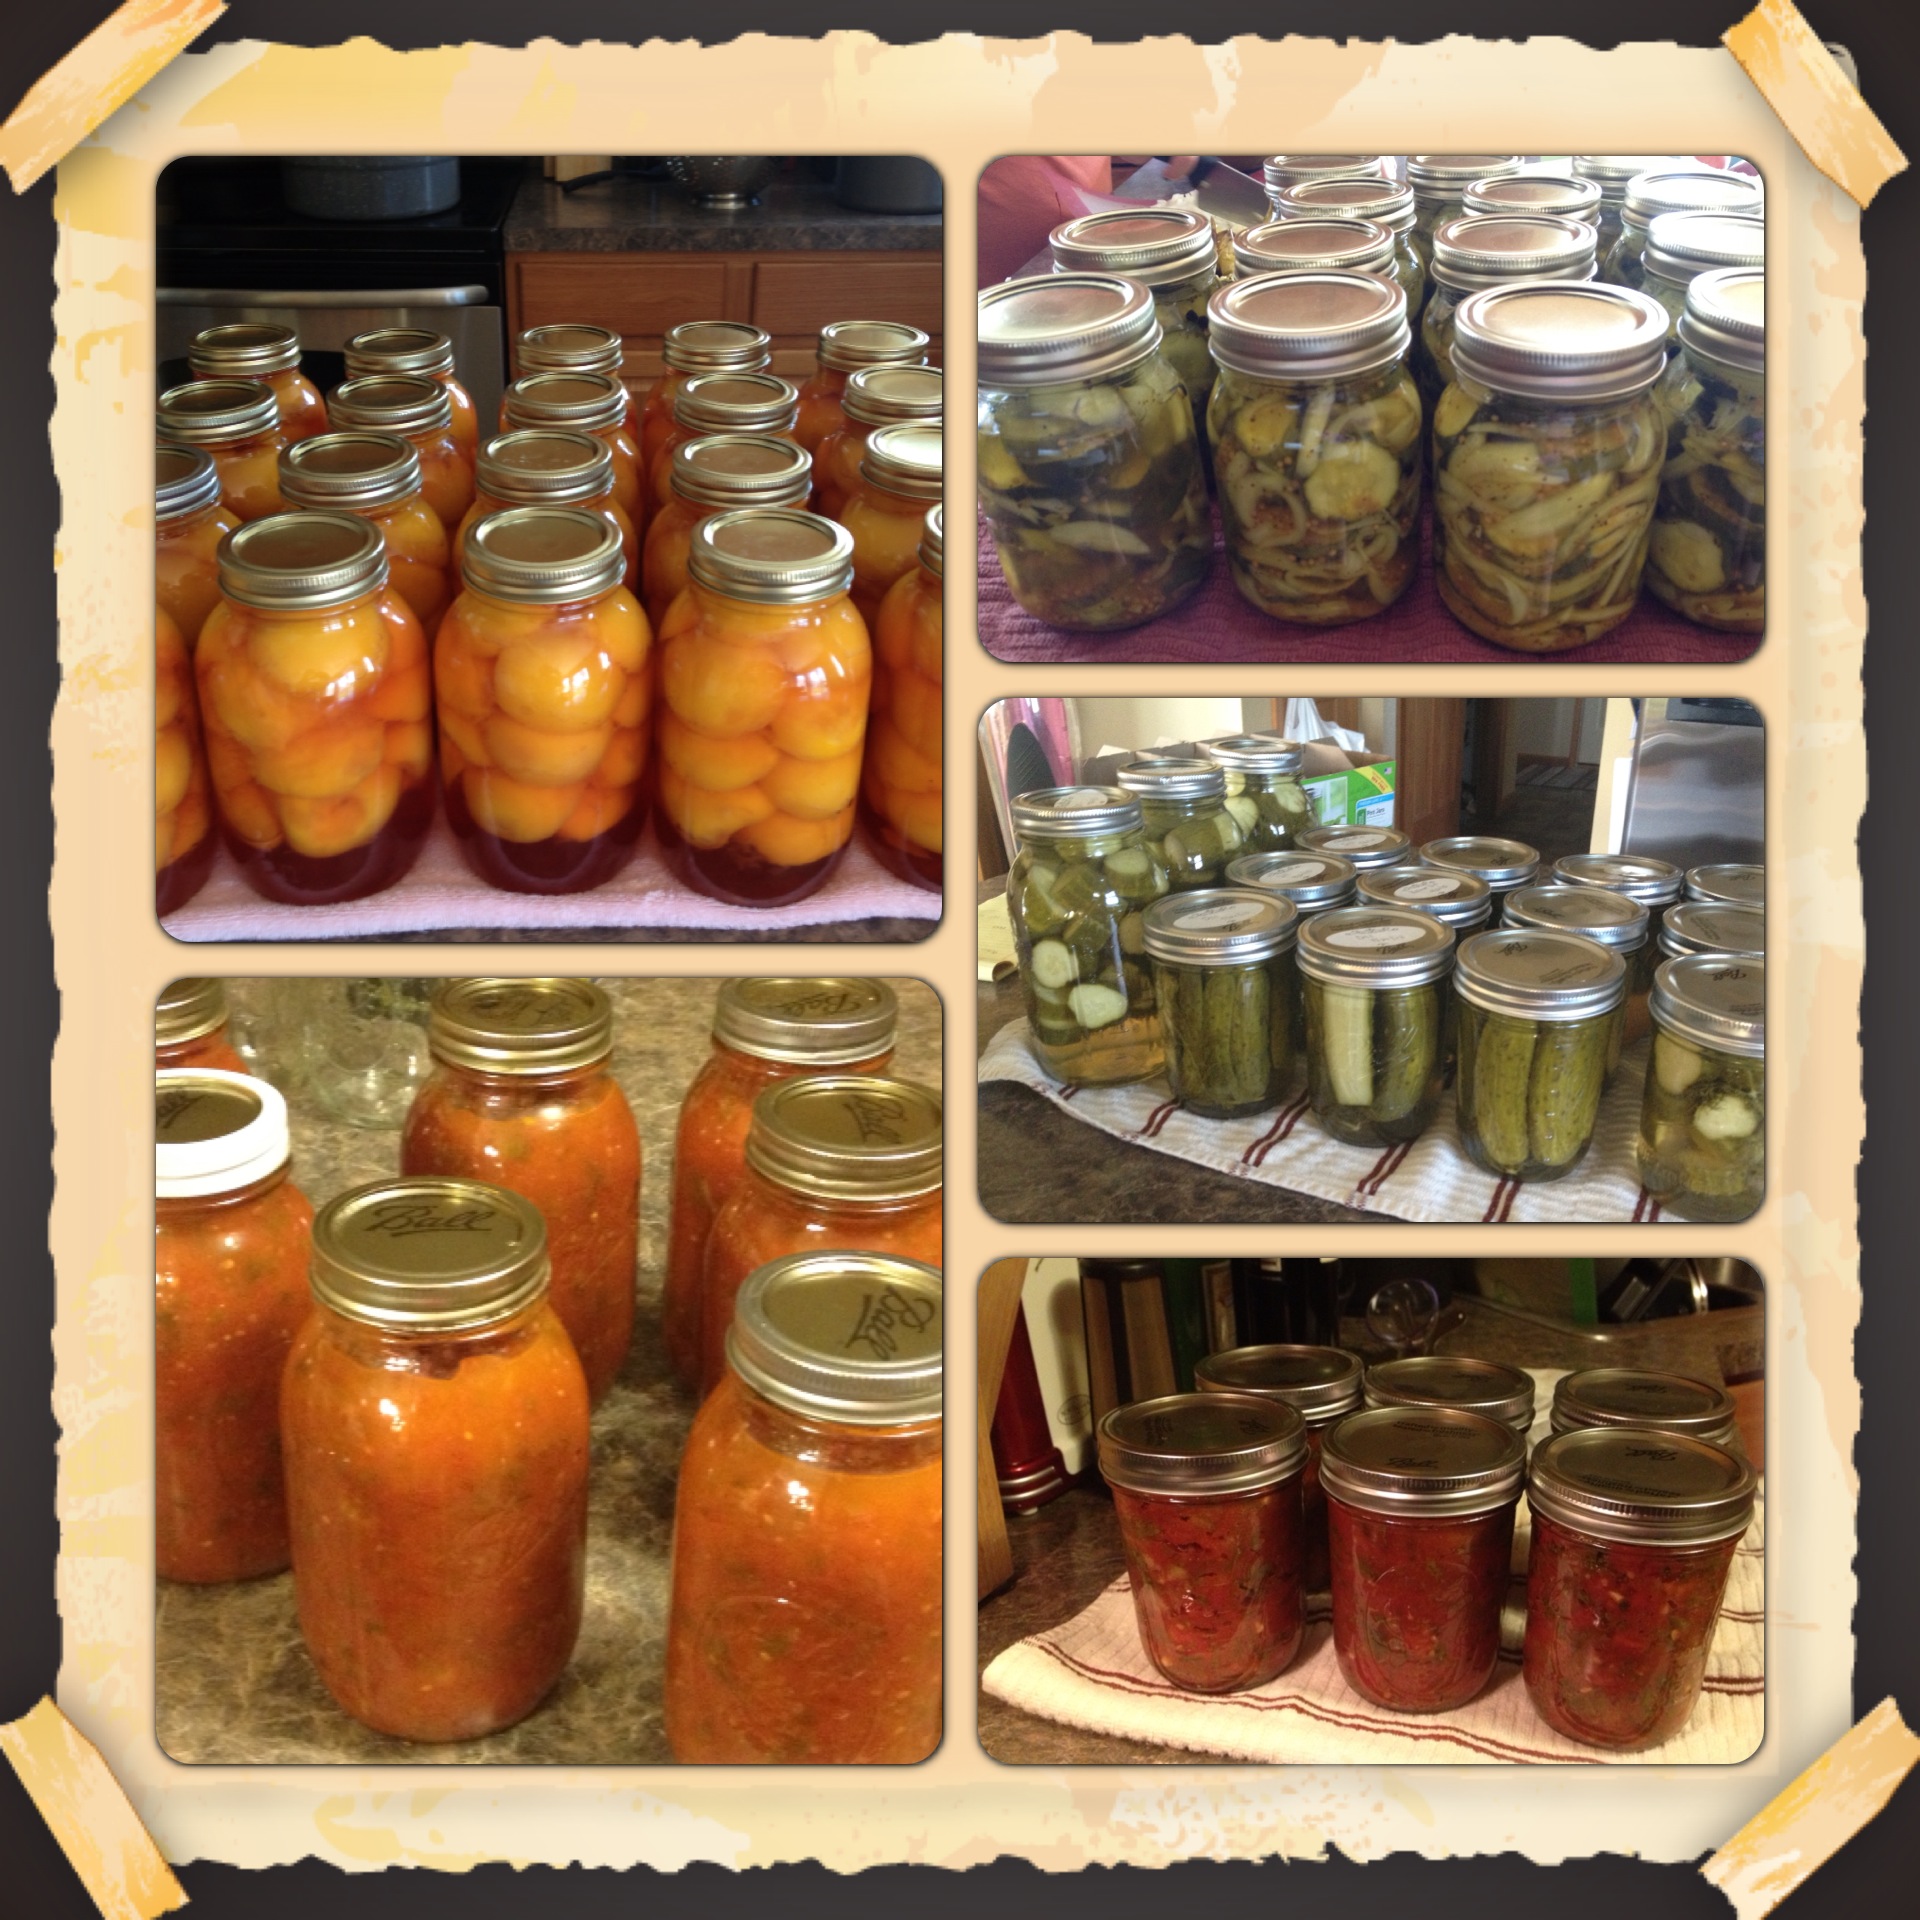
The last shift (and the one that has received the most attention) is canning.  This is what you need to know.  This is not new for me.  I was raised on home canned products.  My parents had a huge garden when I was little, and they had a limited budget.  My mom canned over 350 jars of produce every year and this is what we ate all winter.  She baked all our bread (Saturdays were bread making days) and baked everything from scratch.  We never had commercially made desserts or artificial anything in our house.  I thought I was deprived because my mom never bought Twinkies.  Now, I see how lucky I was.  When I was young, I did not have chemicals in my food.  Nobody talked about organic, but that is exactly what we had, because it was grown by us or farmer friends, or was picked off fruit trees in my grandparent’s yard.  We didn’t drink Kool-Aid and Coke was a once a week treat (one small glass out of a shared bottle).  When I was in my early 20’s, I did some canning and preserving but over time, gave it up.  I have taken it up again and I feel like I am preparing the foods of my childhood.  We don’t have  big garden so we buy from the local farmer or farmer’s market.  I do this because it is DELICIOUS (I dare you to find a canned peach that tastes as good as the ones I canned), and because I enjoy it.  The work is tiring but cathartic.  I love being in the kitchen and I love making good nutritious food for my family.  It combines my love for cooking with the part of me that cares for my loved ones through food.  I know exactly what ingredients are going into everything I make and know that what I am making is healthy.  At the suggestion of Cindy Bench of Bench’s Farms, I have started a canning diary so I know exactly how much produce results in how many jars of finished product.  I will make note of when I run out so I know how much more or less to can next year.

As many of you know, I am less than two years away from being an empty nester.  I NEED to have hobbies people!!  The things I am doing are fun.  They combine the things that I love and have resulted in a hobby that is useful.  I am not interested in selling or starting a business.  I just want to make products for me and my family to use that will have benefits to our health, skin and bodies and will reduce the use of chemicals in our home and food.

That is the story.  As you can see, this has been an evolution for me.  You could say that it started 5 years ago, or you could make the argument that it started 42 years ago in my mother’s garden and kitchen.  I will try not to push my philosophy on others, but will be glad to post pictures of the wonderful things I make and answer questions from anyone who is interested in starting to do any of the things that I love.  If you want to make changes, start small.  No change is too little.

I believe that my health is a gift and that it is my responsibility to protect that gift as best I can.

Going Natural – DIY Cleaning Wipes

Cleaning Wipes

I saved the best for last.  I think this is my very favorite product.  At our house, my husband and I are pretty picky about a clean kitchen.  We are both CONSTANTLY cleaning the counters.  I also hate a dirty bathroom counter and sink.  As a result, we used a lot of antibacterial wipes to do spot cleaning.  There is not a lot wrong with this in the bathroom (other than the expense) but I never felt great about using them in the kitchen because of the chemicals in them.  This product is a GLORIOUS alternative.  I absolutely love them.  They smell heavenly, are a fraction of the cost of antibacterial wipes and I feel very good about using them on the surfaces that might come in contact with food.

1 cup distilled water
1 cup vinegar
lavender essential oil (I use about 25 drops)
squirt of castile or dishwashing soap (optional)
Roll of paper towels, cut in half

Cleaning Wipes

First you will need the right sized containers for this.  You will need something that is big enough around to handle the diameter of a paper towel roll.  It will need to be at least half the height of a paper towel roll.  I found a two pack of plastic containers at Walmart for $2.88.  Since I wanted to make one set for the kitchen and one set for the bathroom, this was perfect.

The first thing you do is cut a roll of paper towels in half and take out the cardboard core.  At first, I tried to use a serated bread knife which just mangled my paper towels.  I ended up using a sharp Chef’s knife that cut right through everything.  The cardboard core comes out easier than you might thing.  If you can find an edge to un-peel it, that helps get it out.  Otherwise just work it out slowly without pulling the center of the towels out.  I use Kirkland brand paper towels from Costo.  They are a pretty durable paper towel and I think this is important because they have to hold up to the moisture of the solution.  If you aren’t a bulk shopper, just pick a sturdy towel.  Since you are already using just half a sheet for each one (since you are cutting the roll in half), I don’t recommend the “select-a-size” type towels.

Mix all the liquid in the bottom of the container you will store them in.  Take the half roll of paper towels (already de-cored) and put it into the liquid.  It will quickly soak up the liquid in the bottom of the container.  Put on the lid and turn the entire container upside down.  In a couple of minutes, the entire roll will be saturated.  Just pull the “wipes” out from the center.

Going Natural – DIY Furniture Polish

Furniture Polish

I picked this variation mostly because I love the lemony small of furniture polish.  Since this product does not have vinegar in it, I will keeping a close watch on it to make sure it doesn’t start growing things.  I have a feeling that this one will have a shorter shelf life because of the ingredients.  For this reason, it makes sense to make a small amount at a time.  This makes 4 oz. so a small spray bottle (I found mine in the travel sized toiletry section) works great.

1/2 teaspoon of olive oil
3 teaspoons lemon juice
10 drops of Lemon Essential Oil
distilled water to fill bottle (or 4 oz)

Furniture Polish

Going Natural – DIY Glass Cleaner

Glass Cleaner

This is another product that has lots of variation.  The simplest recipe is equal parts vinegar and water.  However, many recipes call for either rubbing alcohol or “other” alcohol like vodka.  I believe the alcohol is important to reduce streaking because it helps everything evaporate.  However, some sites assert that rubbing alcohol is a caustic chemical that shouldn’t be used.  These people fall into the vodka camp.  I just couldn’t bring myself to waste perfectly good vodka on my mirrors so I went with the less expensive rubbing alcohol.

1 cup distilled water
1/2 cup rubbing alcohol
1/2 cup vinegar

Glass Cleaner

This is the one product that doesn’t smell great.  Of course adding essential OILS to a glass cleaner would probably create a blurry streaky mess.  So…I have to live with a functional product that doesn’t make my nose do a happy dance.  🙂

Going Natural – DIY Soft Scrub

Soft Scrub

This is another favorite.  I put this product to the test right away on the day that I made it.  I decided that my Easter present to my teenaged daughters would be to clean their bathroom for them.  I NEVER clean their bathroom and it is the source of much tension and conflict between them.  The result…nobody seems to clean it.  This job definitely put my cleaning products to the test.  I used the soft scrub on their tub and sink and just about every surface in the bathroom.  I just scooped some out onto a damp sponge and started scrubbing.  I couldn’t believe how well it worked.  A little bit went a long way, which was also very surprising.

I store this in a wide mouthed quart size Mason jar.  After about a week, I noticed it was starting to get thicker, so I assume it would eventually dry out if not used.  I just added about a Tablespoon of water and remixed it and it was fine again.  I don’t use Soft Scrub much because I tend to keep up on things like sinks and tubs.  When you keep up on them with All Purpose Cleaner or Cleaning Wipes, the Soft Scrub isn’t necessary that often.  However, I do like a sparkling sink and this works great.

2 cups baking soda
1/2 cup Dr. Bronner’s liquid castile soap
10 drops tea tree oil
15 drops lavender essential oil
2 tbsp water
2 tbsp distilled white vinegar

(Note: I did not have enough castile soap for this so I substituted a natural dish soap that I found in the same aisle at my Kroger.  It is MUCH less expensive and worked so well that I’m not sure I could justify the extra expense of castile soap.)

Soft Scrub

Mix all ingredients EXCEPT the vinegar into a paste (should be the consistency of frosting).  Once everything is mixed, add in the vinegar.  The vinegar will react with the baking soda and will make everything foam up.  Mix well and store in an air tight jar.

Going Natural – DIY All Purpose Cleaner

All Purpose Cleaner

I. Love. This. Cleaner.  It takes about 2 minutes to make.  It smells great and it cleans really well.  The best part is that I can spray it all over my kitchen counters and not worry at all about whether it will come in contact with food.

For this cleaner (and the other liquid cleaners), I recommend getting a kitchen funnel if you don’t have one.  I needed to buy one and the funnels I found in the kitchen aisle were expensive.  So I went over to the auto parts aisle at Walmart and found a small funnel for $0.98 that is perfect.  I also had to buy a spray bottle for this.  I found empty spray bottles in the cleaning supply aisle for $0.98.  Although this recipe does not fill the bottle, I have not doubled it yet because I want to make sure the shelf life is long enough to last through a double batch.

1/4 cup lemon juice (I buy organic lemon juice in big bottle at Costco because I use lemon juice all the time when I cook)
1/2 cup distilled white vinegar
1 cup water
tea tree essential oil
lavender essential oil
1 tsp castile soap

All Purpose Cleaner

Just pour all the ingredients in a bottle and shake.

The castile soap and essential oils are listed as optional on the recipe I used.  I LOVE the smell of the oils so I did add them.  When I originally bought the oils, I bought lemon, lavender, tea tree and eucalyptus.  If you just want the basics, I would stick with lavender and lemon.  I will use tea tree as long as my original bottle lasts and then will probably switch to lemon.  Also, castile soap is an all natural soap that is great.  It is also VERY expensive.  We had enough on hand for this so I used it.  If you don’t have it, you could either substitute dish soap or just skip it.

Going Natural – DIY Dishwasher Cubes

Dishwasher Soap

This is one of the first things I found, and the product that has required the most experimentation.  We have used detergent “cubes” in our dishwasher.  They are more expensive but I just like the simplicity.  So when I saw a recipe for dishwasher soap cubes, it looked kind of fun.

The first mistake that I made is that I bought ice cube trays that made cubes that were too big for the soap compartment in my dishwasher.  I didn’t think this would matter because the blogs I read said to just toss the cube in the bottom of the washer.  Unfortunately, my dishwasher has a rinse cycle that would dissolve all the soap and then drain it so there was nothing left by the time the wash cycle started.  This little problem requires me to stand next to my dishwasher while the rinse cycle goes, then open it up after it drains and as it is filling back up for the wash cycle.  Not only is this a pain, but I have some sort of attention deficit disorder and NEVER get this right.  It took me 3 tries and 3 cubes to get it right one morning.  Long story.  The solution is to buy small ice cube trays and test them first.  I made ice cubes in the 2nd set of trays, then took an ice cube and made sure the soap compartment would close.  Now I just have to use up the first batch that I made.  If you don’t want to mess with this, I will give you the powder alternative at the end of this post.

1 cup Borax
1 Cup Super Washing Soda
1/4 cup Epsom salt (or kosher salt) – this is a natural “scrubber”
1/2 cup lemon juice

Dishwasher Cubes

Mix the dry ingredients first.  Then mix in the lemon juice so it is a wets all the dry ingredients and is mixed well.  Put scoops of this in ice cube trays and press down.  Let the mixture dry overnight.   I got over-eager in the first batch and tried to take them out after a couple of hours because they seemed dry on the top.  Those crumbled a lot.  The ones that I let sit overnight popped out of the trays very easily the next morning and didn’t crumble.

After using this for a few loads, we noticed that there was a film on the dishes, especially the plastic ones.  So I researched some more and discovered that vinegar is a great rinse agent.  I poured some in the rinse agent compartment in my dishwasher and the next load came out perfect.

If you want the dry powder alternative, use ½ cup of citric acid (found with canning supplies at the grocery store) instead of the lemon juice.  Citric acid is about $3 for 1 cup so it is more expensive than using lemon juice which I always have on hand.

September 2013 Update: I am still looking for a recipe that really works.  I have seen lots of posts out there with this (or a similar) recipe and they claim it works great.  But even with vinegar in the rinse compartment, my dishes still had a film.  I really like sparkling glasses, so am not using this anymore.

Citric Acid

Going Natural – DIY Fabric Softener

Fabric Softener

This is probably the product that had the most variety in options.  Many say to mix a bottle of your favorite conditioner with vinegar.  Some just said to put Vinegar in your Downy ball or the compartment for liquid fabric softener in your washer.  This is how I learned that Vinegar is a natural softener.  (By the way, baking soda is also a natural softener so the homemade laundry detergent will already have some softening properties).   For the variations that included conditioner, I learned that the conditioner was just for the smell.

I settled on a liquid recipe.  There are also many options out there for “dryer sheets” if you prefer that.  I thought they seemed like a bit of a hassle so wanted something that I could put in my Downy Ball.

1 cup distilled water
1 cup baking soda
2 cups distilled white vinegar
essential oils for fragrance (I used lavender)

Fabric Softener

IMPORTANT: This one is quite the chemistry experiment.  It is very important to mix the baking soda,  water, and essential oil into a paste FIRST.  Then SLOWLY pour in the vinegar. It will fizz up a lot so if you dump it all in at once, you will have a mess.

Once this is mixed, the baking soda will settle in the bottle.  Give it a good shake to mix it up each time you use it.  I use about ¼ cup in my Downy Ball.  Some sites say to use ½ cup but I have found that ¼ cup works just fine for us.

I use distilled water because I read on one site that it will reduce the likelihood of creating a petri dish with the natural ingredients.  I tend to think that vinegar would prevent this, but decided at $0.88 per gallon, distilled water was a good safeguard and I use it in all the products that call for water.

Going Natural – DIY Laundry Detergent

For those of you who follow my regular blog, please don’t go away!  I am diverting from my normal posts for a series on DIY natural cleaning products.  I want to break it into a series of posts so that people can easily find information on specific products later.   If you aren’t interested in this topic, please don’t unfollow this blog.  I will return to my regular programming after this cleaning intermission. J  Email followers, you will probably get a series of about 10 emails in pretty rapid succession as I plan to post these all at once.  Once the initial flurry is finished, my blog life will return to normal.

Laundry Detergent

This is the first DIY cleaning product that I saw.  Before that, it really hadn’t occurred to me to make my own.  My cousin posted this on her blog as a money saving alternative to store bought detergent.   When I started researching natural products in earnest, I was surprised to find that this fell into that category.  I have chosen to use Fels Naptha soap in this detergent because I felt that a laundry soap would be more effective.  However, I have seen variations that call for the milder Ivory soap or an store bought all natural soap (like Bronner’s soaps).   It is simple and very inexpensive to make, regardless of what soap you choose.

1 Cup Borax
1 Cup Super Washing Soda
1 Bar Fels Naptha soap

Laundry Soap

There are many different recommendations on how to mix this soap.  I tried several different ways, and after some trial and error came up with the following:

Mix the first two ingredients together.  Using a hand grater, grate the Fels Naptha soap.  It is yellow so will actually look like grated cheese.  Then put the grated soap in a food processor and pulse until it is broken down into a very fine “powder”.  Mix with the dry ingredients, close container and shake.

Many of the sites I found said to mix this in the blender, including the dry ingredients.  This did NOT work for me, and nearly burned out the motor in my blender.  I do not recommend this method. J

I found all 3 ingredients in the laundry soap aisle of Walmart.  The boxes of Borax and Super Washing Soda will easily make 6 batches.  The total cost for 6 batches (including 6 bars of soap) is about $12.50.  High Efficiency washers need about 1 Tablespoon of this.  I do NOT have a high efficiency washer so I use about a Tablespoon and a half (use more for heavily soiled clothes).  Each batch makes 3+ cups.  At 1 ½ Tablespoons per load, this translates to 32 loads.  Six batches should wash 192 loads.  Total cost per load is $.065 per load.

Additional note: I made some of this for a friend and she asked if it was good for sensitive skin.  That prompted me to Google “DIY natural laundry soap for sensitive skin”.  This exact recipe popped up in several blogs.  Comments on those DIY blogs indicate that it is indeed good for sensitive skin.  Some people commented that they have family members with extremely sensitive skin or eczema and that this worked great for them.  If you don’t want to take your chances, replacing the Fels Naptha with an different bar soap should eliminate any worry.

Going Natural – DIY Cleaning Introduction

For those of you who follow my regular blog, please don’t go away!  I am diverting from my normal posts for a series on DIY natural cleaning products.  I want to break it into a series of posts so that people can easily find information on specific products later.   If you aren’t interested in this topic, please don’t unfollow this blog.  I will return to my regular programming after this cleaning intermission.  Email followers, you will probably get a series of about 10 emails in pretty rapid succession as I plan to post these all at once.  Once the initial flurry is finished, my blog life will return to normal.  As soon as I get all the posts uploaded, the product list below will link to the related post.

Today’s Advice to My Beautiful Daughters – Take care of your environment and take care of you.

A few weeks ago, I started researching natural cleaning products of the DIY variety.  I don’t know exactly what prompted it.  For a long time, I have made the effort to buy cleaning products that are labeled as environmentally friendly or “green” but they are expensive and I wasn’t convinced they were as good as they were purported to be (with the exception of the REALLY expensive stuff that I couldn’t bring myself to spend the money on).  I was inconsistent to say the least.  Then a few months ago, my cousin, who has a great blog, wrote a post about DIY laundry detergent.  At the time, that seemed just a little over the top.  But I didn’t forget it.  I think she gets the credit for getting my wheels turning.

Pinterest is a great source of information, so I started pinning and researching and pinning some more.  I created a board for all the stuff I was finding.  I noticed that there were lots of common elements to the products.  Some had more focus on natural, others had more focus on DIY and saving money.  I decided to focus my research on DIY AND natural.

First, I’ll mention my key learning and then I will get into the actual products I have made and how I adjusted them to make them work after my first try.  First, I learned that vinegar is the bomb!  It does just about everything.  It disinfects, it sanitizes, it softens, it cleans and it is cheap!  I learned that baking soda is both a softener and can be an abrasive (like for sink cleaning).  I learned that Borax is a natural element that has been used for cleaning for a long long time.  I learned that washing soda is just baking soda that has been baked (or something like that).  This process increases its cleaning properties but maintains the natural characteristics.  I learned that essential oils have all kinds of aromatic, disinfecting and cleaning properties as well.  There are TONS out there.  I’ll tell you more about the ones I settled on later.  Essential oils are the only pricey ingredient that I have used.  Everything else that goes into these are either things I already have in my pantry or were very inexpensive.  All of the products could be made without them for the truly budget conscious, but I think they make a big difference in how my house smells.  In other words, the aromatics were important to me, especially since I learned that my kids hate the smell of vinegar.

Supplies

The Supplies

Pinterest was great for finding lots of information, but when I got ready to actually make my first batch of products, I found it to be a bit disorganized.  Lots of sites list multiple products in a single post (or pin) and I started to have trouble finding the things I wanted to make in the midst of all the noise.  Because I had pinned everything I thought had promise or good information, I couldn’t find the things I wanted to make easily. For that reason, I will be breaking this into a series of posts.  This is the introduction.  After this, I will make one post per product so things don’t get lost in the shuffle.  It will also be the way I re-organize my own boards on Pinterest so my adjustments are easy for me to find later.

The products that I will be detailing are:

1)      Laundry detergent

2)      Liquid fabric softener

3)      Dishwasher cubes

4)      All Purpose Cleaner

5)      Soft Scrub

6)      Glass Cleaner

7)      Furniture Polish

8)      Cleaning Wipes

Products

The Products

These are the products I have made so far and I love them all. I will be sure to tell you what makes my favorites so fabulous, but I really do like them all.  Click here to see or follow my “All Natural” Pinterest board.